Pages

Showing posts with label Crafts. Show all posts

Wednesday, January 5, 2011

Back on the Project Train.

Well, I feel great to be back on my creative roll! Baby quilt is well under way, but it's a slow process and I felt the need to just pump something out. So, when one of the lovely ladies on a website I'm on posted a link to a tutorial on how to make your own car seat cover of course I had to try it out! I was planning on simply throwing a blanket over the seat to keep him covered when necessary, but this way he doesn't get hit in the face with a blanked and the handle is kept out, so it's a win-win!

I also have to give myself props on the color selection. Somehow I managed to match the red in the car seat almost exactly, which I love. Just a couple of things about this tutorial:


1) To give yourself an easier time with the seams, etc. I suggest using 1/2 inch seam allowances rather than the 1/4 inch suggested.

2) Remember that most of the measurements in the tutorial are for the FINISHED project, so in order to have seam allowances as stated you have to add that length to each cut piece of fabric.

3) On the straps: I just made them about 8" long AFTER they were sewn and both ends closed. This meant that in order to place them correctly on the car seat cover, you just fold each in half, mark the halfway point with a crease or fabric pencil, and then sew it in 2 places: 1/2" to either side of the middle crease.

4) Also, when placing the straps, I think that were I to make this one again I would place them closer to the center. They are placed 11 1/2" from the outer edges (sides, not top & bottom) of the cover. I personally would put them closer to 13" in. They slip just slightly down the sides of the car seat handle when sewn 11 1/2" in, and I think just a little closer to center would be better.


5) The directions for placing the straps are a little vague: I marked the distance in and down on the main body of the car seat cover, then placed the straps by finding the exact middle of the strap and matching that point to my mark, then sewing on my pre-drawn lines.

6) If you are piecing the main body of the cover (like I did and as shown in the tutorial) I made the bottom accent (the red) a total of 4" tall. I personally like that amount, but I wanted to give anyone making this an idea of how big that panel is. So, the red on the bottom is 4" and the patterned piece is 38" for a total of 42" in height.

7) The curved corners are a matter of eyeballing it. I think I made mine so that at the deepest point (aka, the point of the square corner to the center of the curve) about 3", and it worked well. I might consider doing about 4" next time to avoid the corners dragging on the ground, but it's pretty even.


I had to include a picture of the cover flipped up, if only because I'm so proud of that color match (OK, almost match, but still). I also love the monkey strap pads that my mom got us. Granted, our car seat came with cushions on the straps already, but these were too darn cute not to use!!!!
post signature

Wednesday, December 8, 2010

Sock Monkey Hat and Other Randomness!

Well, after finishing my initial sock monkey hat (as seen modeled by my puggle, Cloe) I was almost immediately asked to make another. I've got to watch it, though, because I have a quilt that is VERY time-consuming to finish before this baby gets here, and I'm procrastinating on it. I really think it's just the sheer magnitude of it that makes me so unwilling to work on it, but once I get started it will go right along!


We managed to get our Christmas Tree this weekend...and, despite a rather unnerving episode (see below) I was able to get all the decorations out, set up, and working. Now I begin the countdown until I can take it all down. It's weird...I love having them out, I love seeing seasons change through the house decor (part of why I love fall and winter), but I also love it when I "get my house back" and no longer have all the decorations taking up space on my surfaces. I also love not having Christmas Tree needles all over the ground.  Ben insisted that I wrap empty boxes so that it at least looks like we have presents under the tree. He's already got his gift (Ipad) and we're getting mine in the next week or so (blue tooth installed in my car...the stereo has the button but it's "not equipped").


I also got our Christmas Card picture taken. No, I'm not in it. I'm really not feeling up to tackling that monster...between  Ben, 2 dogs, and myself, it would be virtually impossible to get a shot where everyone looks good and is doing what they are supposed to. Especially when you throw in the fact that the dogs have "uniforms" that they HATE. Can't you see how happy they look? This took about an hour, a half a bag of dog treats, and a ton of "wardrobe adjustments" to get. If I had to add  Ben in, with his tendency to look like he's in pain when he smiles for pictures, plus myself (and my apparent inability to take pictures without a double chin and look halfway decent other than in my belly pictures) it just would not have worked. Can you say disaster?


OK, on to my "episode." I went to the pharmacy on Sunday to pick up a prescription refill. No biggie, right? Yeah, that's what I thought too. As I'm pulling into the parking lot, I start feeling...off. Then too hot, and then the distinctive feeling that I'm going to throw up. Wait, wait, no, that's not all. Then tunnel vision. Mind you I'm still driving. Then I realize that I KNOW this feeling. I'm about to pass out. All I could think was "Park the car, park the car, PARK THE G-D*&N CAR NOW!!!". I did manage to park the car. So far it's all happened in about 20 seconds. In the next 10 seconds my hearing gets VERY muffled, then the tunnel vision is compounded by my vision appearing pixelated and orange. Suddenly, I just KNOW that I'm going to throw up. I throw open the car door (car is in park, e-brake on, and key off) and proceed to dry heave. I sat in the car for probably 5 minutes before I could think of anything other than how awful I feel. And then I realize that I do not have my cell phone on me...I have to get home. Here's the weird thing. At that point Monkey started moving, and as soon as he did ALL of my symptoms went away. I felt fine. Oh...my prescription wasn't in yet. Oh joy.


I managed to get home...yay me. I called the nurse on Monday and she said it sounds like Vena Cava syndrome, where Monkey was resting on the main blood vessel that carries blood back to the heart...either that or he was on the vegus nerve. And if it happens again, it's off to a workup complete with EKG for me. Wonderful.


Up next week: another growth scan to see if Monkey is growing better, plus a standard office visit and 20 more minutes hooked up to a fetal monitor (I do this once a week, but after next week it will be twice weekly). Stay tuned.
post signature

Thursday, November 4, 2010

Amy Butler Modern Diaper Bag!!! (And a couple of other things!)

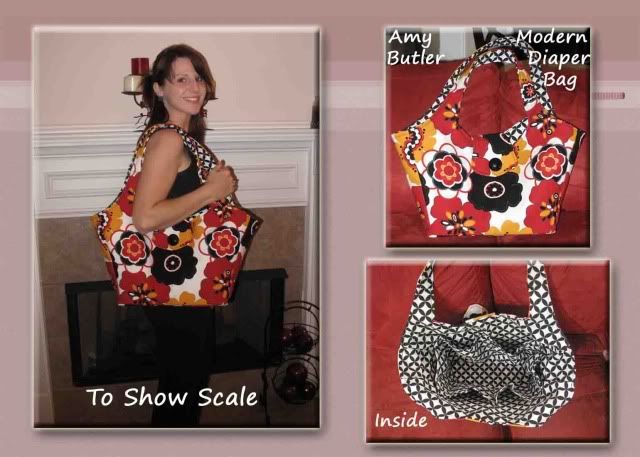
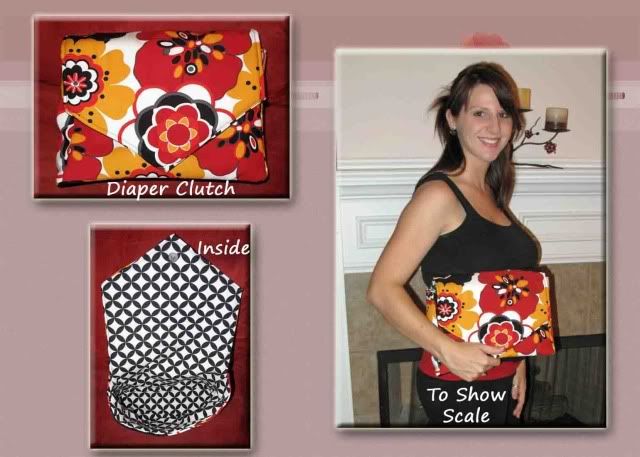
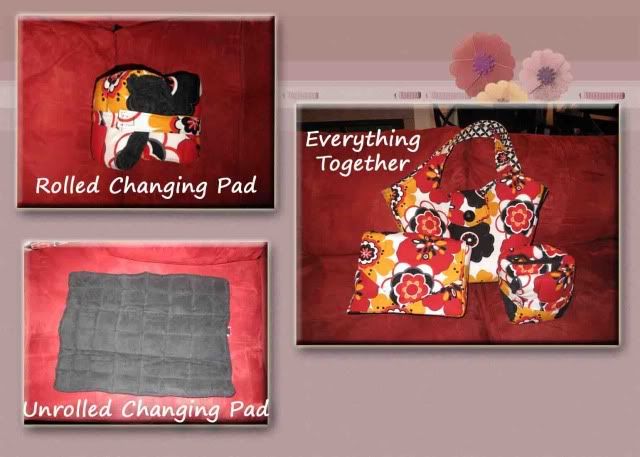
Well, I did it! It's finished! I'm so proud of myself...it took me 4 days, a few machine needles, and more than a few choice words, but it's done! I completed the modern diaper bag, the changing pad that goes with it, and a diaper "clutch" for those times when I don't need the whole big bag with me. I will say that had I kept the dimensions as listed in "Little Stitches for Little Ones" it would have been WAY too big for me. Also, the changing pad does call for 2 layers of batting, but if you buy the thick batting you only need one. I used 2 layers of 3/4" batting and it's too bulky...I had to lengthen the strap on the changing pad to make it work (but that could also be because I don't like just rolling it into a tube, I tri-fold one way and then another). I used the instructions from The Ogden's Modern Diaper Bag Post to cut down the size of the bag to about 75%, which works perfectly for me.

I had some difficulty turning the bag from inside-out to right side-out, until I realized that I had attached the straps wrong (way to go pregnancy brain and exhaustion) but once I fixed that there wasn't really a problem at all. I also intended the clutch to be smaller, but I was guessing at dimensions and it turned out too big. That's OK, now I just have a small diaper bag (aka clutch) to take with me when the full sized bag would be too much. Is anyone else surprised/impressed that  Ben helped pick out the fabric? He says that it was so that he could get out of the fabric store faster, but I'm still happy. It would have taken me FOREVER to choose if he hadn't stepped up!

He also got to feel Monkey really MOVE the other day. He had his hand resting on my belly, and baby full on KICKED his hand...so hard that  Ben jumped away because it surprised him so much!

post signature

Thursday, October 28, 2010

New Day, New Blog

Well, kind of. I got bored, and I haven't liked the name/look of this blog for a while, so I played. I really didn't like that when I started this blog I labeled myself as a fertility-challenged army wife...because that's not really how I see myself. Why would I put that out there? Because I was at a low point in my life (just discovering that I am reproductively challenged) and wasn't anywhere near a mood to be creative with blog titles. It didn't help that the only thing on my mind was the infertility and  Ben's upcoming deployment. So (as is the case with many things when you're down) I named it for the two things that were on my mind...I named myself via adjectives, descriptors that aren't really what make me up as a whole but rather that are parts of my life. So I decided to "clean house" so to speak. I'm still iffy on text colors, but I think I really like the new title, and that's a good thing, since that was the hardest part.
And although sometimes I feel like this:            

I hope most of the time the content of the blog looks like this:

Yay! I'm so excited for a new start, more crafts, pregnancy/family news, and lots of good things to come! 
post signature

Tuesday, October 5, 2010

I give up! I'll just make it myself!

So, after searching and searching for the perfect diaper bag (you know, the one where functionality, design, fabric, and price are all PERFECT) I give up. It's not out there. If I find one I love, it's $100 or more, and I'm just not willing to pay that much for something that is going to carry diapers (both clean and otherwise) and bottles, among other things. SO...I'm making my own. This way, even if I spend more (but I'm estimating it won't cost me more than $60 or so) I'll love everything about it. I have decided on this style of bag, designed by Amy Butler (see picture). Of course, in looking at pics online of this bag, I'll have to cut it down some, because it's huge. However, there is a blog out there with the dimensions that the crafter used, and I think it will be perfect! The really good news: the patterns for other diaper bags that I liked were in the range of $12 for one pattern...I got this book with 20 patterns for $16, including shipping. I'd say that's a good deal!


I'm just so excited, now I'll get everything I want, plus other projects included if I want to try them. YAY!
post signature